Ever wondered how to securely access your RemoteIoT setup from behind a firewall using a Mac server? Well, buckle up because we’re about to deep dive into the nitty-gritty details. In today’s digital age, setting up IoT devices behind a firewall is not just a cool tech move—it’s essential for security and efficiency. So, if you’re here looking for answers, you’ve come to the right place. Let’s get started, shall we?
When it comes to IoT (Internet of Things), the possibilities are endless. But what happens when your organization or home network has a strict firewall setup? Accessing your IoT devices can become a nightmare. That’s where this guide comes in. We’ll walk you through the steps to use RemoteIoT behind a firewall using a Mac server, ensuring everything stays secure and functional.
Whether you’re a tech-savvy individual or someone who’s just dipping their toes into the world of IoT, this article will provide you with all the information you need. From configuring your Mac server to setting up port forwarding, we’ve got you covered. Let’s make sure your IoT devices remain connected, secure, and efficient.
Read also:Hdhub4u Movie Your Ultimate Destination For Cinematic Bliss
Understanding RemoteIoT and Why It Matters
First things first, let’s break down what RemoteIoT actually is. In simple terms, RemoteIoT refers to accessing and managing IoT devices remotely. This could include anything from smart home gadgets to industrial sensors. The beauty of RemoteIoT lies in its ability to provide real-time data and control, making it a game-changer for both personal and professional use.
But why does it matter? Well, in today’s fast-paced world, having the ability to monitor and control your IoT devices from anywhere is crucial. Whether you’re managing a smart home or overseeing an entire factory, RemoteIoT ensures that you stay connected and in control, no matter where you are.
Challenges of Using RemoteIoT Behind a Firewall
Now, let’s talk about the elephant in the room—firewalls. While firewalls are designed to protect your network from unauthorized access, they can also pose a significant challenge when it comes to accessing RemoteIoT devices. Firewalls often block incoming connections, making it difficult to connect to your IoT devices from outside the network.
- Firewalls can block incoming connections
- Security concerns when opening ports
- Limited access to certain services
These challenges can be frustrating, but fear not! With the right setup and configuration, you can easily overcome them. Let’s explore how to use RemoteIoT behind a firewall using a Mac server.
Setting Up Your Mac Server
Step 1: Install macOS Server
The first step in setting up your Mac server is installing macOS Server. This powerful tool allows you to manage and control various services on your network, including RemoteIoT devices. To install macOS Server, follow these simple steps:
- Download macOS Server from the App Store
- Install the application on your Mac
- Launch the app and follow the setup wizard
Once installed, you’ll have access to a range of services that can help you manage your IoT devices more efficiently.
Read also:Hdhub4u Full Movie Your Ultimate Streaming Destination
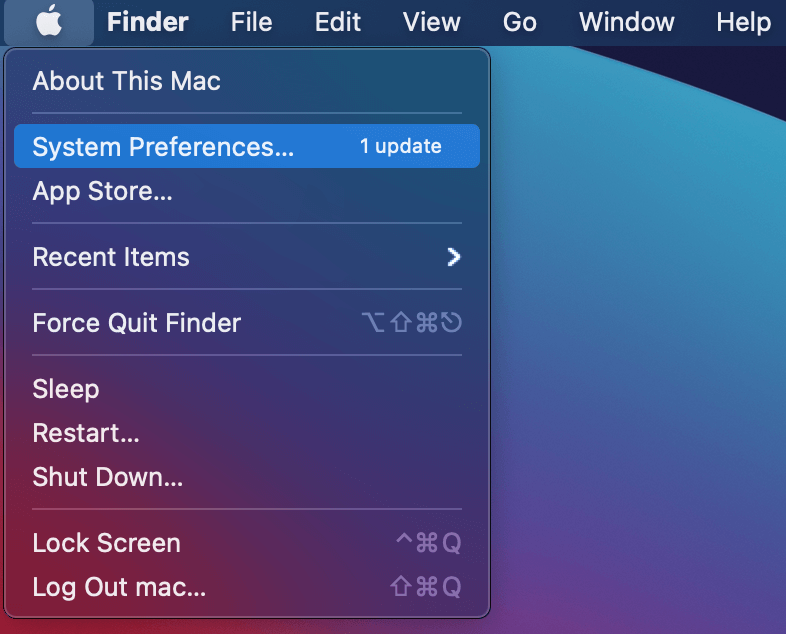
Step 2: Configure Network Settings
Next, it’s time to configure your network settings. This involves setting up static IP addresses for your Mac server and IoT devices. Static IP addresses ensure that your devices always have the same address, making it easier to manage and access them.
To configure network settings:
- Go to System Preferences > Network
- Select your network connection and click Advanced
- Set a static IP address for your Mac server
Don’t forget to configure your IoT devices with static IP addresses as well. This will make the entire setup process smoother and more efficient.
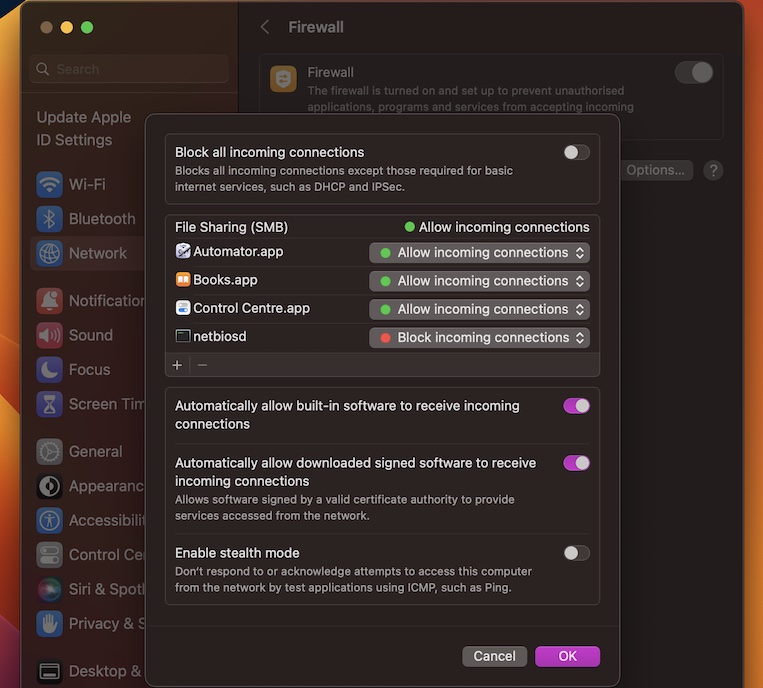
Configuring Firewall Settings
Step 3: Open Necessary Ports
Now, let’s tackle the firewall. To access your RemoteIoT devices from outside the network, you’ll need to open certain ports on your firewall. This allows incoming connections to reach your Mac server and IoT devices.
Here’s how to open necessary ports:
- Log in to your router’s admin panel
- Locate the firewall settings
- Open the required ports for your IoT devices
It’s important to only open the ports that are absolutely necessary. This helps maintain the security of your network while still allowing access to your IoT devices.
Step 4: Set Up Port Forwarding
Port forwarding is another crucial step in using RemoteIoT behind a firewall. It allows you to direct incoming connections to specific devices on your network. Here’s how to set up port forwarding:
- Log in to your router’s admin panel
- Locate the port forwarding settings
- Enter the static IP address of your Mac server
- Specify the ports you want to forward
By setting up port forwarding, you ensure that incoming connections are directed to the right devices, making it easier to access your IoT setup remotely.
Securing Your RemoteIoT Setup
Step 5: Use SSL/TLS Encryption
Security should always be a top priority when setting up RemoteIoT behind a firewall. One way to enhance security is by using SSL/TLS encryption. This ensures that all data transmitted between your devices and the Mac server is encrypted and secure.
To enable SSL/TLS encryption:
- Generate an SSL certificate for your Mac server
- Install the certificate on your server
- Configure your IoT devices to use HTTPS
By implementing SSL/TLS encryption, you protect your data from unauthorized access and potential cyber threats.
Step 6: Implement Strong Authentication
Another important security measure is implementing strong authentication. This involves using strong passwords and enabling two-factor authentication (2FA) wherever possible.
Here’s how to implement strong authentication:
- Create strong, unique passwords for all devices
- Enable 2FA on your Mac server and IoT devices
- Regularly update and change passwords
With strong authentication in place, you can rest assured that only authorized users have access to your RemoteIoT setup.
Testing Your Setup
Once you’ve completed the setup process, it’s time to test everything. This involves verifying that you can access your RemoteIoT devices from outside the network. Here’s how to test your setup:
- Attempt to connect to your Mac server from a remote location
- Verify that you can access your IoT devices
- Check that all data is transmitted securely
If everything works as expected, congratulations! You’ve successfully set up RemoteIoT behind a firewall using a Mac server.
Troubleshooting Common Issues
Of course, no setup process is without its hiccups. Here are some common issues you might encounter and how to troubleshoot them:
- Can’t connect to the server: Check your firewall settings and ensure the necessary ports are open.
- Slow connection speeds: Optimize your network settings and consider upgrading your internet connection.
- Security alerts: Double-check your SSL/TLS configuration and ensure all devices are updated.
By addressing these issues promptly, you can ensure a smooth and secure RemoteIoT experience.
Benefits of Using RemoteIoT Behind a Firewall
Now that you know how to set it up, let’s talk about the benefits of using RemoteIoT behind a firewall. Some of the key advantages include:
- Enhanced security through controlled access
- Improved efficiency in managing IoT devices
- Flexibility in accessing devices from anywhere
These benefits make it clear why setting up RemoteIoT behind a firewall is a smart move for anyone looking to take their IoT setup to the next level.
Conclusion
And there you have it—a comprehensive guide on how to use RemoteIoT behind a firewall using a Mac server. From setting up your server to configuring firewall settings, we’ve covered everything you need to know. Remember, security should always be a top priority, so make sure to implement all the necessary precautions.
Now it’s your turn! Have you tried setting up RemoteIoT behind a firewall? Share your experiences in the comments below. And if you found this guide helpful, don’t forget to share it with your friends and colleagues. Together, let’s make the world of IoT more accessible and secure.
Table of Contents
- Understanding RemoteIoT and Why It Matters
- Challenges of Using RemoteIoT Behind a Firewall
- Setting Up Your Mac Server
- Configuring Firewall Settings
- Securing Your RemoteIoT Setup
- Testing Your Setup
- Troubleshooting Common Issues
- Benefits of Using RemoteIoT Behind a Firewall
- Conclusion