So, you're looking to dive into the world of IoT SSH from anywhere free on Windows 10 command line? Well, buckle up, because we're about to take a deep dive into this tech-savvy topic. Whether you're a seasoned pro or just starting out, knowing how to remotely access your IoT devices using SSH can be a game-changer. Let's get started, shall we?
In today’s hyper-connected world, being able to SSH into your IoT devices from anywhere is no longer a luxury—it's a necessity. Imagine controlling your smart home setup or monitoring your remote server without being physically present. Sounds pretty cool, right? With the right tools and a bit of know-how, you can achieve this on Windows 10 using the command line. No expensive software required!
Before we jump into the nitty-gritty, let’s break down what we’re talking about. IoT (Internet of Things) refers to the network of physical devices connected to the internet. SSH (Secure Shell) is a protocol that lets you securely access and manage these devices remotely. Combine the two, and you’ve got a powerful combo that can simplify your tech life. Let’s explore how to make this happen for free on Windows 10.
Read also:Ullu Web Series Movie A Thrilling Journey Into Indias Bold Digital Entertainment
Understanding IoT SSH: Why It Matters
First things first, why should you care about IoT SSH? Well, here's the deal: as more and more devices get connected to the internet, the need for secure remote access becomes crucial. Whether you're managing a smart thermostat, a security camera, or even a remote server, SSH provides a secure way to interact with these devices from anywhere in the world.
Using IoT SSH isn’t just about convenience; it’s about security. Traditional methods of remote access can leave your devices vulnerable to hackers. SSH encrypts your data, ensuring that your communication with your IoT devices remains private and secure. Plus, with Windows 10's built-in command-line tools, you don’t need to spend a dime to set this up.
Now, let’s talk about the benefits:
- Cost-Effective: No need to buy expensive software or hardware.
- Secure: SSH uses encryption to protect your data.
- Flexible: Access your devices from anywhere with an internet connection.
- Easy to Set Up: With Windows 10, the process is straightforward.
How IoT SSH Works
Here’s a quick breakdown of how IoT SSH operates. When you use SSH, you’re essentially creating a secure tunnel between your computer and the IoT device. This tunnel allows you to send commands and receive data without exposing sensitive information to the public internet.
The process involves:
- Setting up an SSH server on your IoT device.
- Configuring your Windows 10 machine to act as an SSH client.
- Using the command line to establish a connection.
Once you’ve got everything set up, you can start sending commands and managing your devices remotely. It’s like having a virtual hand on your IoT setup, no matter where you are.
Read also:Hdhub4u Punjabi Movie Your Ultimate Guide To Streaming And Downloading
Setting Up IoT SSH on Windows 10
Alright, let’s get down to business. Setting up IoT SSH on Windows 10 is easier than you might think. Follow these steps, and you’ll be up and running in no time.
Step 1: Enable SSH on Your IoT Device
First, you’ll need to make sure that SSH is enabled on your IoT device. This process varies depending on the device you’re using, but generally, you’ll need to:
- Log in to your device’s admin interface.
- Look for the SSH settings and enable the service.
- Take note of the device’s IP address, as you’ll need it later.
For example, if you’re using a Raspberry Pi, you can enable SSH by running the following command in the terminal:
sudo systemctl enable ssh
This command ensures that SSH starts automatically when your device boots up.
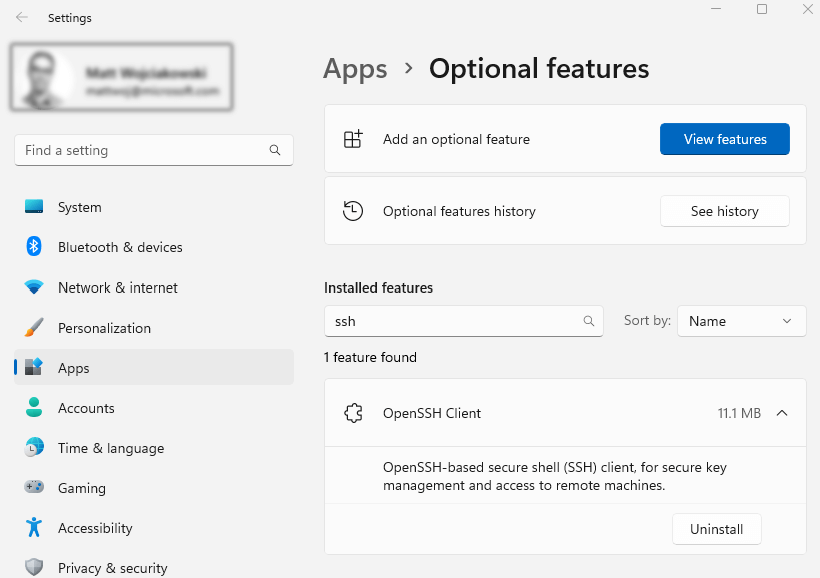
Step 2: Install OpenSSH on Windows 10
Next, you’ll need to install OpenSSH on your Windows 10 machine. Here’s how:
- Open the Start menu and search for "Turn Windows features on or off."
- Scroll down and check the box for "OpenSSH Client."
- Click "OK" and restart your computer if prompted.
Once installed, you can use the command line to connect to your IoT devices via SSH.
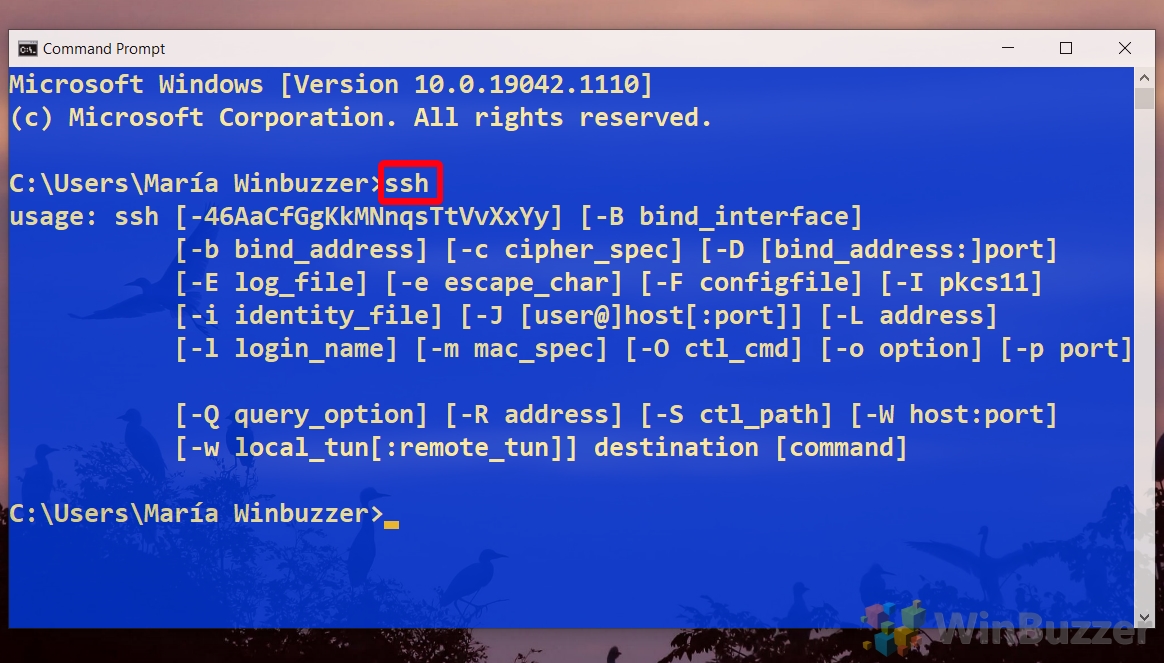
Step 3: Connect to Your IoT Device
Now that you’ve got everything set up, it’s time to connect. Open the Command Prompt on your Windows 10 machine and type the following command:
ssh username@ip_address
Replace "username" with the username for your IoT device and "ip_address" with the device’s IP address. You’ll be prompted to enter a password. Once you’ve entered it, you’ll be connected to your device.
Advanced Tips for IoT SSH
Now that you’ve got the basics down, let’s explore some advanced tips to make the most out of IoT SSH on Windows 10.
Tip 1: Use SSH Keys for Passwordless Login
Tired of typing in your password every time you connect? SSH keys can help. Here’s how to set them up:
- Generate a key pair by running the command:
ssh-keygen - Copy the public key to your IoT device using:
ssh-copy-id username@ip_address - Now, you can log in without entering a password!
This not only saves time but also enhances security by eliminating the need for passwords.
Tip 2: Port Forwarding for Remote Access
What if you want to access your IoT device from outside your local network? Port forwarding is your answer. Here’s how to set it up:
- Log in to your router’s admin interface.
- Find the port forwarding settings and create a new rule.
- Set the external port to 22 (the default SSH port) and the internal IP to your IoT device’s IP.
With port forwarding, you can access your device from anywhere in the world using your public IP address.
Common Issues and Troubleshooting
Even the best-laid plans can hit a snag. Here are some common issues you might encounter and how to fix them.
Issue 1: Connection Refused
If you’re getting a "Connection refused" error, it could mean that SSH isn’t running on your IoT device. Double-check that the SSH service is enabled and running. You can also try restarting the device to see if that resolves the issue.
Issue 2: Permission Denied
A "Permission denied" error usually means that your username or password is incorrect. Make sure you’re using the right credentials and that SSH keys are properly configured if you’re using them.
Security Best Practices for IoT SSH
While SSH is a secure protocol, there are still steps you can take to further protect your IoT devices.
Tip 1: Change the Default SSH Port
Changing the default SSH port from 22 to something less common can deter automated attacks. Just remember to update your port forwarding settings if you do this.
Tip 2: Use a Firewall
A firewall can help block unauthorized access attempts. Make sure your router and IoT device have firewalls enabled and properly configured.
Real-World Applications of IoT SSH
So, why bother with all this? Here are some real-world applications of IoT SSH:
- Smart Home Management: Control your smart home devices from anywhere.
- Remote Server Monitoring: Keep an eye on your servers without being physically present.
- Industrial Automation: Manage industrial IoT devices in real-time.
These applications showcase the versatility and power of IoT SSH, making it an essential tool for tech enthusiasts and professionals alike.
Data and Statistics
According to a recent study by Statista, the global IoT market is expected to reach $1.6 trillion by 2025. This growth highlights the increasing importance of secure remote access solutions like IoT SSH. Additionally, a survey by Cybersecurity Ventures found that 60% of companies experienced a data breach involving an IoT device. These stats underscore the need for robust security measures when managing IoT devices remotely.
Conclusion
In conclusion, accessing IoT SSH from anywhere free on Windows 10 command line is not only possible but also highly beneficial. By following the steps outlined in this article, you can set up a secure and reliable connection to your IoT devices from anywhere in the world. Remember to prioritize security and take advantage of advanced features like SSH keys and port forwarding to enhance your experience.
Now it’s your turn! Try out these methods and see how they can simplify your tech life. Don’t forget to share your thoughts and experiences in the comments below. And if you found this article helpful, be sure to check out our other guides on all things tech-related. Happy hacking!
Table of Contents
- Understanding IoT SSH: Why It Matters
- Setting Up IoT SSH on Windows 10
- Advanced Tips for IoT SSH
- Common Issues and Troubleshooting
- Security Best Practices for IoT SSH
- Real-World Applications of IoT SSH
- Data and Statistics
- Conclusion